I spent a whole afternoon yesterday staring at GTM preview like a confused raccoon, honestly.
Meta Pixel Purchase event firing, Advanced Matching configured, email and names showing in the GTM variables, everything “Succeeded” in green.
And yet, Facebook Test Events just shrugged at me: no email, no first name, nothing, just IP and user agent.
If that sounds familiar, you’re probably in the same boat I was: Advanced Matching looks correct in GTM, but the actual events don’t carry any user data.
And you start wondering if Meta, GTM, or you are broken (could be all three, but here it was just the setup).
What most guides tell you to do (and why it quietly fails)
Pretty much every GTM + Meta Pixel tutorial says something like:
- Create a Base Pixel tag firing PageView on all pages.
- Turn on Advanced Matching in that base tag, map
email,first_name,last_name, etc. - Create a Purchase tag that fires on your Thank You page.
- Also turn on Advanced Matching in the Purchase tag, map the same variables.
It sounds sensible.
You fire the base pixel first, the purchase later. You can even add tag sequencing, so Purchase fires “after” the base tag. GTM preview shows your variables populated, so it feels like you did your homework.
Except, there is a tiny timing detail that these guides completely gloss over.
On most ecommerce setups (Memberpress, WooCommerce, custom checkout flows, even some Shopify + GTM integrations), the purchase Data Layer push happens after the page loads.
That means:
- Page loads
- Base Pixel fires immediately
- Data Layer does not yet contain user email, first name, last name (!!!)
- Base tag tries to read Advanced Matching variables → they are
undefined - A moment later, your purchase script pushes user data into the Data Layer
- Purchase tag fires, now sees the correct data, but the pixel was already initialized earlier with no user data 🙁
The pixel initialization is kind of “locked in” at that point.
So instead of something like:
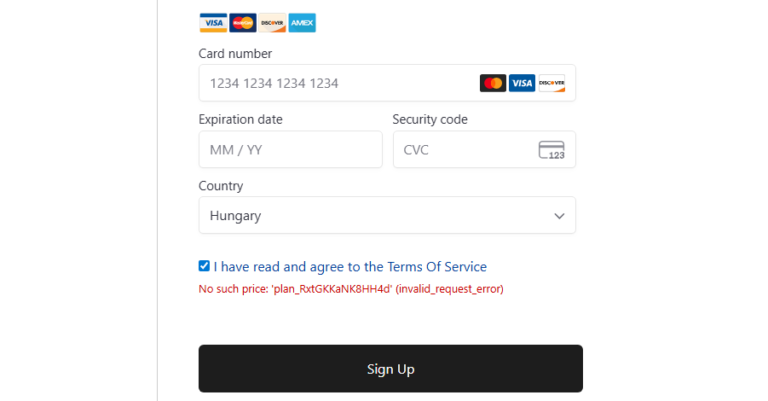
textfbq('init', 'PIXEL_ID', {em: 'user@example.com', fn: 'Tom', ln: 'Smith'})what really happened is closer to:
textfbq('init', 'PIXEL_ID', {em: undefined, fn: undefined, ln: undefined})And your Purchase tag only does fbq('track', 'Purchase', {...}), so the user data never gets attached at init time.
From Meta’s perspective, you’re sending anonymous conversions.
How to check if Advanced Matching is really sent (ignore the pretty UI for a moment)
I think relying on the Pixel Helper or Test Events UI alone is a mistake, because they sometimes hide or filter data, especially when you test with your own email or your own account.
The only honest place to look is the browser Network tab:
- Open DevTools in Chrome (F12).
- Go to Network.
- Filter for requests containing
facebook.com/tr. - Do a test purchase.
- Find the request where
ev=Purchase. - Inspect the query string parameters.
If Advanced Matching is actually working, you should see keys like:
ud[em]→ hashed emailud[fn]→ hashed first nameud[ln]→ hashed last name
You might also see things like cud[em] or aud[em] depending on how the pixel normalizes and hashes them. But if ud[...] is completely missing, then Facebook did not receive user data, no matter how pretty GTM looks.
In my broken setup, value/currency/content_ids were all there, but no ud[em] anywhere.
Why this matters for your Event Match Quality (and your ads)
Meta uses this user data to calculate your Event Match Quality score, which goes roughly from 0 to 10.
Several case studies show that moving your score from “OK” (like 4–5) to “Great” (8–9) can improve reporting accuracy and the stability of your ad performance.
High EMQ basically means more conversions successfully matched to real users, which feeds the algorithm with better training data.
If your Purchase events are missing email/name, you’re capping your EMQ and making your targeting less precise, especially after iOS & tracking restrictions kicked in. So this isn’t just “nice to have”, it can directly affect CPA and ROAS over time.
The fix that finally worked: stop initializing too early
The thing that finally made everything click for me was this: the pixel should not initialize on the Thank You page before user data exists.
So instead of letting the base pixel fire there, I changed the pattern:
- Let the base pixel fire on all “normal” pages.
- Block / exclude the base pixel from the Thank You page.
- On the Thank You page, let the Purchase tag (with Advanced Matching) be the first Meta Pixel tag that fires.
When the Purchase tag runs and sees that the pixel hasn’t been initialized yet, the tag template does something like:
fbq('init', 'PIXEL_ID', {em, fn, ln, ...})using your Advanced Matching variables.- Then
fbq('track', 'Purchase', {value, currency, content_ids, ...}).
At that moment the Data Layer already contains the user data from the purchase event, so the initialization finally has the right email and name.
Why does this work?
How I configured GTM in the end
To make this less abstract, here’s roughly how I wired it:
Base Meta Pixel tag
- Tag type: Facebook Pixel ( Facebook pixel template by Simo Ahava)
- Event name: PageView
- Trigger: All Pages
- Exception trigger: Page path contains
/thank-you/(you can adapt this to your URL structure) - Advanced Matching: Enabled, mapped to the same Data Layer variables (even if they’re not available everywhere, that’s fine)
Purchase Meta Pixel tag
- Tag type: Facebook Pixel (same template)
- Event name: Purchase
- Trigger: Custom event from the Data Layer (for example
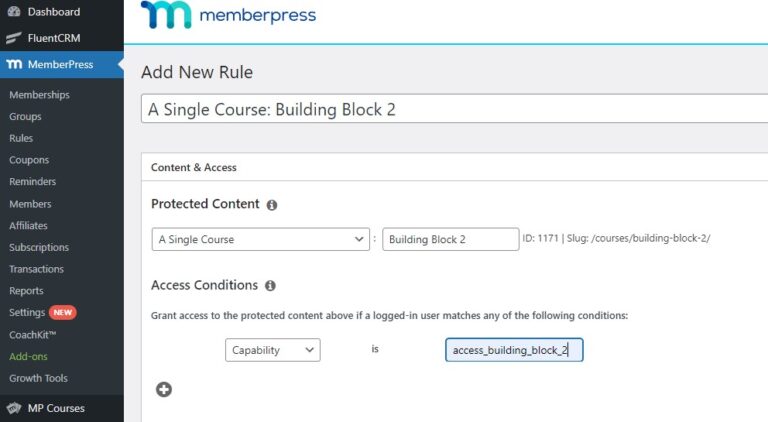
purchase). On my Memberpress setup, this only fires on the Thank You page. - Advanced Matching: Enabled, mapped to email / first_name / last_name variables that are populated by the purchase
- Object properties: value, currency, content_ids, content_name, num_items, etc.
I didn’t need Custom HTML in the final version. The key was simply to remove the base tag from the Thank You page so the Purchase tag became the first and only initializer there.
Reinitialize the pixel?
I also read on Reddit that you can re-initialize the pixel with the Purchase tag, but this does require a bit of custom code, and you cn’t use the GTM template tag this way.
Nothing AI can’t handle, but I went the simpler route.
Double‑checking that it really works
After that change, when I ran another test purchase and checked the F12 network log for the Purchase request, I finally saw:
ud[em]=cdd6c840fc496a3d3a930d95ef5ff2db80c8b3f670a41cb748a338caf4d77113ud[fn]=e1608f75c5d7813f3d4031cb30bfb786507d98137538ff8e128a6ff74e84e643ud[ln]=1693dfaf76d3b4e269a9f6b5207a7338be034d2f1370d71993a3ccb8a9bb6a5a
And Meta Test Events started listing:
Advanced matching parameters: Email, First name, Last name, IP address, User agent
At that point, I was pretty convinced the issue was solved. The nice side effect is that this pattern is simple enough for developers and site owners to copy without digging into custom pixel code.
Short recap for skimmers
If I had to reduce this to a sort of checklist:
- If your Purchase events don’t show Advanced Matching (email/name) despite being configured in GTM, you probably initialize the pixel before the data exists.
- Check the
facebook.com/tr?ev=Purchaserequest in your browser Network tab. If there’s noud[em]/ud[fn]/ud[ln], then Facebook isn’t getting the user data. - Block the base pixel from firing on your Thank You page.
- Let the Purchase tag, with Advanced Matching enabled, be the first pixel tag firing on that page.
- Re-test and confirm you now see
ud[...]parameters in the network request.
It’s a small change, but I think you’ll find it fixes a really annoying blind spot in a lot of Meta Pixel + GTM setups.
Bonus
If you’re still stuck configuring the GTM tags for the purchase event and the Advanced Matching, here is a video that shows you the details: